EVA Foam 101
- Lyrical Villain Cosplay
- Oct 12, 2019
- 6 min read
Updated: Jun 23, 2023

I've hit every subject except this one so far and it's about time I dropped the intro blog for EVA Foam. There is no lack of blogs, videos and tutorials out there on working with EVA foam, and for good reason.
EVA Foam is one of the least expensive methods you can use to create cosplay armor and props. You don’t need super fancy tools to work with it, and there are many different ways to work with it.

What Should I Use?
EVA foam comes in various sizes and thickness. The ideal sizes for armor range between 1mm-6mm in thickness. EVA Foam can be bought in small pieces or massive rolls. If possible make sure you are purchasing High density foam. It is stiffer and maintains its shape better than the other types of foam.
EVA foam gym mats are pretty popular for the textured undersides and the sturdiness of the foam. They are used for larger builds like full body armor from Mass Effect, Halo, or the Marvel Cinematic Universe and are especially popular to use when making prop weapons.

Deciding which thickness to use is really a cosplayer’s preference. I find that I enjoy using 2-4 mm for building vambraces, pauldrons and greives. You can use the same thickness for breastplates, and any plate-mail you’re building as well, but I like to use thicker high density foam for those to make sure they’re durable.
1mm foam is perfect for detail work. You can make edging, and raised designs. I’ve also played with EVA foam Clay for detailing work. It’s a little more expensive than the 1mm foam sheets, but much more versatile.
Where Should I Get It?
You can find 1mm, 2mm and sometimes 3mm foam at craft stores like Hobby Lobby, Joanne Fabrics, or Michael's in small 8x10 inch sheets.
If you can’t find them in store, you can purchase sheets and rolls of EVA foam online. Amazon sells rolls and packages of EVA foam and EVA Foam clay and you can also shop in Cosplay.com’s store. They ship fast and the product is reasonably priced.
If you’re looking for the gym mats, I highly suggest looking at Walmart and harbor freight, they’re slightly cheaper at Harbor freight than Walmart.
Check out Types of Foam for more detailed info on types of foam, their pros and cons, and where to get it.
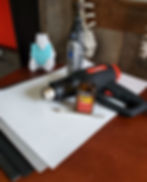
Tools:
You remember when I said you didn’t need any fancy tools, or to spend any crazy amount of money on supplies for your armor? I didn’t lie! All you really need are:
A pair of scissors (an exacto knife or box cutter)
A heat gun
Hot glue gun (If using it as your adhesive but i dont recommend this)
Disposable paintbrushes (If using a brush on glue as a sealant)
If you’re looking to step your detailing game up a bit you can snag:
Soldering iron or hot knife (Optional for engraving details)
Dremel (Not necessary but incredibly handy)
Total cost of all of your mandatory tools needed will equal out to about 30 bucks if you’re thrifty.
Adhesives
I’ve found contact cement works the best when making EVA foam armor. Hot glue can warp your build, and if it’s hot enough outside, the glue will liquify again and your armor may fall apart. (This is more of a problem if the temps hit 90’s and up.)
When using contact cement, remember to use it in a well ventilated area, and follow the instructions on the back. They usually call for you to apply the glue to both surfaces you are sticking together, and wait five minutes until pressing them firmly together.
For maximum effectiveness wait between 15 – 30 minutes before applying any real pressure to the bonded materials.

Supplies
Any additional supplies you will need depend on the build and method of patterning you will be using. Most of them are everyday items such as:
Writing utensils,
Rulers,
Paper or plastic wrap
Duct tape or paper scotch tape
If you are making a build that may be battered in a crowd (Like a pauldron or plate-mail) You can glue wire to help the build maintain its shape.

Patterning Tools and Techniques
Making a pattern for your build is important and how you do this is dependent on what kind of armor/which piece you’re making.
If it’s a bulky build, a carefully drawn and measured paper pattern will work really well.
If the armor is a form fitting singular piece, the Saran wrap/paper tape method is recommended.
The Pepakura method is perfect for intricate or larger armor builds from MCU, Halo, Star Wars, etc.

Pepakura, a free computer program, will take a 3d rendered object and break it down into flat printable pattern pieces. With some finagling this can be used as a patterning tool for foam armor.
Cutting and Construction
Which tool and how you cut your foam is contingent upon how thick your foam is and wether or not it needs to have an angled edge.
You can use scissors on thinner foams (Up to 4mm)
Exacto knives or box cutters should be used for thicker foams, and angled cuts if necessary

Initial Detailing: Materials and Techniques
Detail work can be done before or after heat forming depending on the type of material you’re using. EVA foam details are easily heat formed with a piece. If you chose to trace your initial draft onto paper, you can use your paper pattern to make a layout for your details. If not you can easily use masking tape to make templates for any sculpted details you wanted to add.
If you are using foam clay or other substances to detail your piece Heat forming is best done before detailing to avoid catastrophe. Its handy to lightly trace your designs or detail placement on your piece before heating to make placement easier once the shape is curved.
Be careful not to add on any warpable materials to your build before you seal it. Some sealants are rubbery compounds that will warp the material once applied, Foam will regain it’s shape but plastics and other not as flexible materials may not be so lucky.
Engraved details can be added before or after heat forming and sealing. The heat could widen the cut or detailing a little however.
Heat Forming/Heat Sealing
Heat forming helps your foam to hold a more dramatic curve than it would if you simply bent it. You can even stretch the foam while heating it to add in some additional dimensions to the piece.
One of the added bonuses to heat forming is that while you’re forming your piece you are also sealing it. Heat sealing is super helpful when it comes to EVA foam work. Eva foam is normally pretty porous, if you go to seal the foam without having heat sealed it the foam will absorb more of the liquid.
When you’re heat forming your piece it’s helpful to use tape or another object to help form it, this makes it easier to avoid burning your fingers with the heat source.
Sealants and Sealing for painting
Sealing your Build is one of the last steps to your build. Heat sealing helps mitigate the absorbent quality of EVA foam. Which means less layers of brush on/Spray on sealant for you.

Brush on Sealants:
Woodglue
Elmers
Mod Podge
Flexbond
Spray on Sealants:
Plastidip
FlexSeal
The kind of sealant is very much dependent on your build, but mostly your personal preference and budgetary needs.
Are you looking to stiffen your build? Will it need to maintain some flexibility? What can you afford? If you’re looking to maintain some flexibility I would recommend using Flexbond, Plastidip or Flex Seal. ModPodge or other brush on sealants are good for helping stiffen your build.
Finishing Your Build
There are many different ways to finish your piece.
Spraypaint: Can crack when bent but is effective
Acrylic paint: Is flexible and you can easily mix colors to get your desired shade
Airbrushing: There are certain paints that can and will move with your eva foam without cracking or bending
RubnBuff: Is a good waterproof metallic layer
Spray Adhesive and Fabric: For a leathery look or for builds that might be subject to friction
Worbla or other Thermoplastics: can be folded around an EVA foam piece and make them nearly indestructable
Make sure you use a clearcoat to help protect the paint from wearing down quickly!

How do I attach it to me?
This is the big question that all cosplayers face when making armor. And there are so many options out there that it again falls on what you want and what kind of piece you've built. You can use any of these methods of attaching armor to yourself:
Magnets
Velcro
Elastic strapping
Zippers
(For halo armor and other large projects) Intricate strapping systems that mystify the mind